How to Fix a Leaky Vape Tank

How to Fix a Leaky Vape Tank: Expert Tips from Matrix Vapes
A leaky vape tank is one of the most frustrating issues a vaper can face. If you’re searching for how to fix a leaky vape tank, you’re not alone. Fortunately, leaks are usually easy to prevent and simple to fix with a few quick adjustments and proper care.
In this article, we’ll walk you through the common causes of vape tank leaks, how to fix them, and proactive measures to keep your tank leak-free in the future. If you’re experiencing leaks, don’t panic! Matrix Vapes has all the expert tips you need to get back to a clean and enjoyable vaping experience.
Why is My Vape Tank Leaking?
Understanding the reasons behind a leaky vape tank is the first step in preventing and fixing the issue. Vape tanks are intricate devices that rely on pressure and sealing to keep e-liquid inside. When one of these elements fails, it results in leaks. Below, we’ll explore the most common causes.
1. A Compromised Coil or O-Ring
The coil is the heart of your vape tank, and it plays a crucial role in maintaining the seal. Over time, coils can become worn out, and O-rings can degrade, leading to leaks.
-
Old Coil: Coils that have been used for too long can break down, leading to oversaturation. This occurs when the cotton in the coil can no longer hold the e-liquid properly, causing it to leak out.
-
Faulty O-Ring: The O-ring, which is the small silicone seal around the coil, plays a vital role in preventing leaks. If the O-ring is damaged, misaligned, or missing, it creates a direct path for liquid to escape, resulting in leaks.
-
Coil Not Seated Properly: If the coil isn’t screwed in properly (but not over-tightened), it can leave a small gap where juice can escape. Always ensure the coil is securely fitted to avoid this issue.
2. Overfilling the Tank
It’s tempting to fill your vape tank to the brim, but doing so can result in a leaky tank. Most tanks are designed with a small air gap at the top to maintain the pressure balance. If this air gap is filled, the vacuum seal that keeps the e-liquid in place is compromised, leading to liquid flooding the coil and dripping out through the airflow holes.
3. Thin E-Liquid and Weather Changes
E-liquid thickness plays a key role in preventing leaks. E-liquids that are thin, such as those with higher levels of PG (propylene glycol), are more likely to leak in certain tanks. Sub-ohm tanks, which are designed for thicker e-liquids with higher VG (vegetable glycerin) content, often experience flooding and leaking when used with high-PG liquids.
In addition, extreme temperatures can cause e-liquids to become thinner. Leaving your vape in direct sunlight or a hot car can cause the liquid to thin out, making it more prone to leaking.
4. Weak or Lost Vacuum
The vacuum inside your vape tank helps keep e-liquid in place. If the tank sits idle for too long, the vacuum seal may weaken or disappear. Similarly, if you don’t properly close the airflow control when filling, it can disrupt the internal pressure, causing flooding and leaking.
How to Fix a Leaky Vape Tank: Step-by-Step Guide
If you find yourself dealing with a leaky vape tank, don’t worry! You can follow these steps to identify the cause and fix the problem:
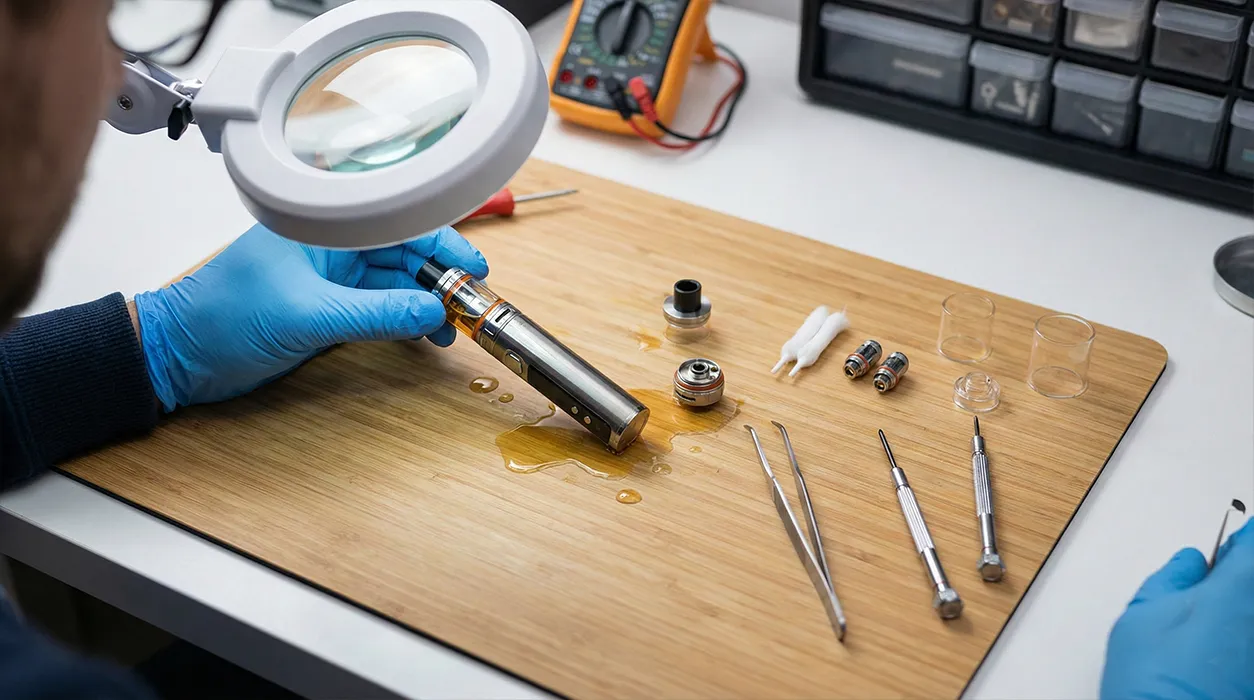
Step 1: Disassemble and Inspect
Start by unscrewing your tank from the battery. This helps avoid any damage to your device. Take apart the entire tank, empty any remaining e-liquid into a sink or back into your bottle. Inspect all the parts for signs of wear and tear.
Step 2: Clean the Tank Thoroughly
Next, clean every part of the tank, except for the coil (as water can ruin the coil). Use warm water to rinse the parts thoroughly and dry them with a paper towel. Pay special attention to the airflow base and the chimney, as these areas are prone to juice buildup.
Step 3: Check and Replace the Coil
The most common culprit behind leaks is a damaged coil or O-ring. Remove the coil and inspect its O-rings for any signs of damage, such as nicks or tears. If the coil is old or the O-rings are damaged, replace the coil. Always use a genuine replacement coil for optimal performance. When installing the new coil, make sure it’s screwed in tightly but not overtightened.
Step 4: Reassemble and Refill Correctly
Once your tank is clean and the coil is replaced, reassemble the tank. When filling, always close the airflow control rings before you open the top cap. This helps maintain the vacuum seal inside the tank. Leave a small air gap at the top of the tank, and never fill it all the way to the brim. After closing the top cap, turn the tank upside down, then open the airflow control. This technique uses air pressure to clear the chimney and prevent flooding.
Preventative Tips: How to Stop Leaks Before They Happen
While fixing a leaky tank is relatively straightforward, the best solution is to prevent leaks from happening in the first place. Follow these simple tips to keep your vape tank leak-free:
Store Your Vape Upright
Always store your vape tank in an upright position. Laying it on its side can cause e-liquid to seep into the airflow holes, leading to leaks.
Match Your Juice to Your Device
Different tanks are designed for different e-liquid compositions. For instance, pod systems generally handle 50/50 PG/VG blends well, while sub-ohm tanks perform best with thicker e-liquids (70% VG or higher). Using the wrong e-liquid can lead to flooding and leaks.
Close Airflow When Filling
This may seem simple, but closing the airflow control every time you refill your tank can prevent leaks. Closing the airflow before filling ensures that the internal vacuum remains intact.
Perform Regular Maintenance
Regular maintenance is key to preventing leaks. When changing your coil, take the opportunity to clean the entire tank and check the O-rings for any signs of wear. Replacing worn O-rings before they cause problems can save you a lot of hassle.
FAQ: Leaky Vape Tanks
Why is my vape tank leaking from the airflow?
Leaks from the airflow holes are usually caused by a flooded coil or improper filling. Make sure you’re not overfilling your tank, and ensure the coil is properly seated and in good condition. Check your O-rings for any damage as well.
How can I stop my vape tank from leaking when I store it?
Always store your vape tank upright. Laying it on its side can cause the liquid to seep into the airflow holes and leak out. Additionally, ensure that the tank is not overfilled, as this can also contribute to leakage during storage.
Can weather affect vape tank leaks?
Yes, extreme temperatures can cause e-liquids to thin out. If your tank is exposed to heat, the juice inside may become runny and more likely to leak. Avoid leaving your vape in a hot car or in direct sunlight.
How often should I replace my vape coil?
Coils should generally be replaced every 1–2 weeks, depending on how often you vape and the type of e-liquid you use. If your coil looks worn or the taste of your vape starts to deteriorate, it’s time to replace it.
Conclusion: Keep Your Vape Tank Leak-Free with Matrix Vapes
A leaky vape tank doesn’t have to be the end of the world. Now that you know exactly how to fix a leaky vape tank you can enjoy a smooth, hassle-free vaping experience. Whether it’s checking your coils, choosing the right e-liquid, or making simple adjustments to your storage habits, there are plenty of ways to keep your tank in top shape.
For more expert advice and the best vaping products, visit Matrix Vapes today. Keep your vape clean, and your juice in the tank where it belongs!
Ready for Leak-Free Vaping?
Looking for the best vape tanks and accessories to prevent leaks? Visit Matrix Vapes today and find everything you need for a seamless vaping experience. Don’t let leaks ruin your day – shop now!